Teaching Wilderness Navigation is challenging because learning it is a challenge. Furthermore, once it is learned, it is easily forgotten. After our classes we provide homework whose main purpose is to help our students identify their own weaknesses and to gain a greater retention of the material. We even offer resources and lend our personal support to the cause. We don’t want our students to forget the material. But they do, nonetheless. They walk out our door with a passable understanding, a plan in place to help them during this tender, critical time, but if they don’t do the homework or don’t immediately dive in and put these very perishable skills to use, they will probably forget them.
So what can we do to change this? We think one way to encourage usage is to provide a practical reason for it. In other words, instead of suggesting a student learn this skill then use it over and over again solely for purpose of not forgetting it, we will instead suggest they learn a skill that can be used daily and can keep them out of trouble on a very fundamental level. Taking baby steps, this article will focus on two skills and two skills only: sighting a bearing and following a bearing. And with these skills they will be able to take a carefree poop in the woods.
-
Sighting a bearing.
- This activity is to point your compass in a particular direction, aiming toward an object or a space between objects. Sighting a bearing will identify that direction locking in a line you can follow.
-
Following a bearing.
- Once a direction or imaginary line is defined, this activity will help you moving from object to object or space to space along this imaginary line — the level of accuracy based on the needs specific to the situation.

So what’s all this have to do with pooping?
We won’t name the person, but, getting lost using the bathroom in the woods has happened. Once, at least, with dire consequences. It’s probably more common than we realize, actually. The process of staying oriented isn’t too terribly hard with the right tools (though to many it may seem that way at first), but getting mixed up is likewise pretty easy to do.
We know you’re starting to wonder, so here’s the long awaited tip of the week/month/year/lifetime: Before venturing into the woods to do your business, so to speak, try sighting a bearing by pointing your compass where you wish to travel along an imaginary line. Then follow it toward the private spot you seek. The reason being, of course, is so that you can follow that same line back, just in the opposite direction. The two lists below will offer these steps in greater detail… for your safety and for your relief!

Okay, so here’s the how-to of it all…
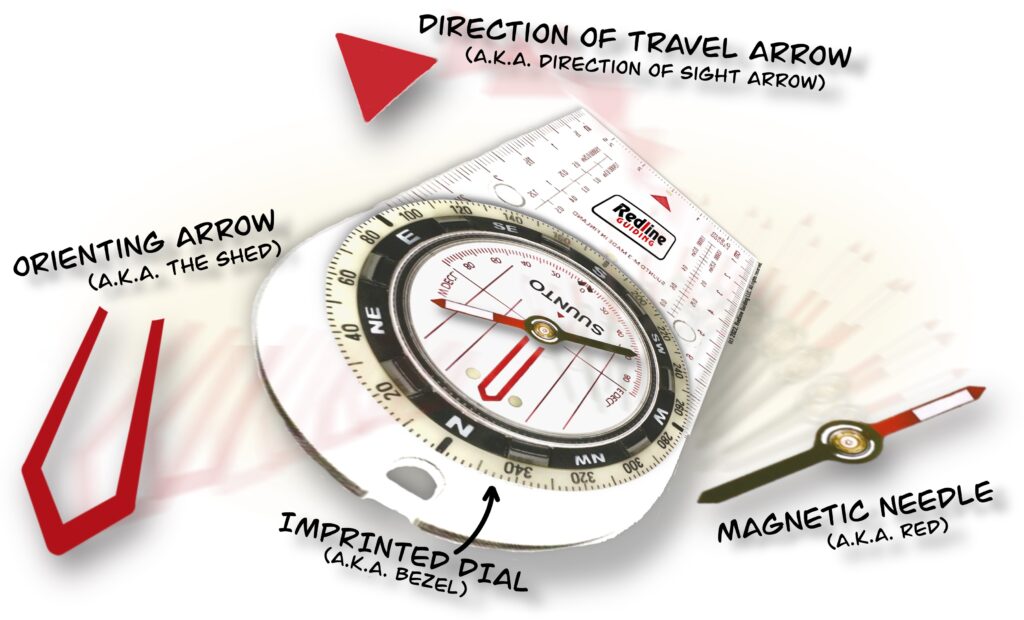
Compass parts used in this operation:
- Magnetic Needle (“Red”).
- Orienting Arrow (“Shed”).
- Imprinted Dial or Bezel.
- Direction of Travel/Sight Arrow.
And now the steps to get it done:
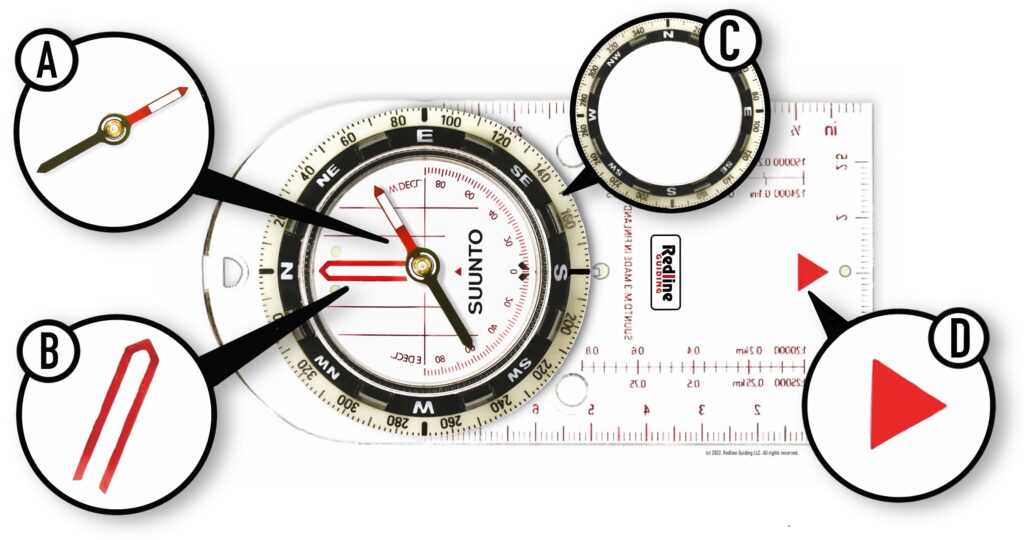
- Point the compass’s Direction of Travel Arrow (D) in the direction you choose to walk, heading toward your pristine and private forest poop-oasis.
- Turn the Imprinted Dial (C) until the Orienting Arrow (B) and RED END of the Magnetic Needle (A) align.
- With “Red in the Shed,” look up and walk to an object on or near your imaginary line. Repeat this step until you’re at your spot in the woods.
- Ahh, now do your business, confident you can find your way back and not become a statistic. Do remember the applicable Principles of LNT before you go, though — to poop is human, but to err is uncalled for. Seriously. Read Principle #3.
- Done with your business, having dealt with your wastes appropriately, now hold your compass as you were before and turn your body until the Magnetic Needle (A) and Orienting Arrow (B) again align — BUT (you gotta keep reading)…
- The Orienting Arrow (B) should now, however, be aligned with the BLACK END of the Magnetic Needle (A)! (See the nemonic below.)
- Now look up and walk to an object on or near your imaginary line, heading back. Repeat until you return to the trail you started from.
That’s it. “Put red in the shed to go ahead, then use black to get back” and poop in the forest with confidence.
Here, this video might help out…

But wait, there’s more…
Other techniques exist. In the interest of keeping things simple, however, we’re not going down the rabbit hole. Though we’ll mention five:
-
Navigate by Contouring.
- To walk perpendicular to a trail that runs up and down on hilly, steeply angled terrain, being sure to stay at a stationary elevation.
-
Navigate by Handrailing.
- To walk with the aid of some landform such as a ridge, gully, or stream bed alongside you, very much like a visual bannister or handrail.
-
Navigate by Duration.
- Time can be recorded. And if you do on the way in — noting that 100 feet or so took one minute — the exit duration may be the same.
-
Navigate by Environment.
- Stay oriented by noting the location of the sun, the source of sounds (trail, road, waterway, people), familiar landmarks and objects, etc.
-
Navigate in the Alpine.
- Absent sight lines above treeline or in the winter, try paying out cord to follow back or use “wands” — garden stake and duct tape flags.


